在VPS上快速搭建hexo博客系统

什么是hexo

Hexo 是一个快速、简洁且高效的博客框架。Hexo 使用 Markdown解析文章,在几秒内,即可利用靓丽的主题生成静态网页。也就是它会将你所有的文章都生成一个个静态网页,有了这些网页文件,你就可以放到任意的服务器上,使用nginx、apache、iis等服务器软件访问。你不需要再花费时间去配置mysql等数据库的支持,大大减轻你的建站工作。本文将向你展示如何快速的在你的服务器上搭建博客网站。

hexo使用的命令非常简单,短短的几个字母就可以把你写的内容转换成一个漂亮的网页,并发布到你的VPS上。

1
2
3
hexo new name #新建一篇文章
hexo g #生成静态网页
hexo d #部署到服务器

安装hexo

  1. 在工作电脑上安装GitNode.js,并配置好相应的环境变量(一般正确使用安装包安装的软件,环境变量会自动配置好,不需要再去手动添加)

  2. 安装hexo

    1
    npm install -g hexo-cli

    该命令将hexo安装到nodejs的全局目录,这样你就可以直接在控制台中使用hexo命令了

使用hexo建站

hexo创建网站实际上是建立一个工作目录,后续的操作都在这个目录中进行

1
2
3
hexo init blog
cd blog
npm install

新建一个blog文件夹,并在其中生成所需的文件,然后用npm安装需要的js包。初始化完成后,文件目录结构为

1
2
3
4
5
6
7
8
9
.
├── _config.yml
├── node_modules/
├── package.json
├── scaffolds/
├── source/
| ├── _drafts
| └── _posts
└── themes/

此时就可以在blog文件夹中生成网页文件了,生成后的网页文件将会保存在public文件夹中。自己写的markdown格式的文章保存在 source/_posts 文件夹下。

1
hexo new post name #新建一篇文章

此时在 source/_posts 文件夹下会生成 name.md 的文件,使用文本编辑器在 name.md 中写文章(推荐VSCode、Typora)。

写好后,使用命令生成网页,网页文件保存在public文件夹。

1
hexo generate #生成静态网页 简写为 $ hexo g

至此,完整的静态网页文件已经生成了,可以将它们放到你的服务器上去啦。浏览效果大致是这样子的

美化网站

原生的hexo主题有点丑,其实hexo有很多漂亮的主题,官网也提供主题库链接,选择你喜欢的主题,下载后放到 themes 文件夹下,然后修改hexo的配置文件 _config.yml 中的 theme: theme_name ,改为你下载的theme的文件夹名。下面以next主题为例说明:

更改主题

  1. 下载主题到theme文件夹,并将主题文件夹命名为next

    1
    git clone https://github.com/iissnan/hexo-theme-next themes/next
  2. 修改blog目录下的 _config.yml 中的 theme: next (注意中间的空格)

更改语言、域名等

修改blog目录下的 _config.yml

1
2
3
4
5
6
7
8
9
10
11
12
13
14
15
16
17
# Site
title: 网站名称
subtitle: 网站副标题
description: 简短描述,可以包含关键字用于SEO
keywords:
author: 作者
language: zh-CN #设置中文
timezone: Asia/Shanghai #设置时区

# URL
## If your site is put in a subdirectory, set url as 'http://yoursite.com/child' and root as '/child/'
url: http://www.你的域名.cn
root: /
permalink: :title/ #文章的永久链接样式

# Writing
post_asset_folder: true #生成资源文件夹,这样就可以将文章的图片等放到与文章同名的文件夹内了

修改主题配置

修改next目录下的 _config.yml

1
2
3
4
5
6
7
8
9
10
11
12
13
14
15
16
17
18
19
20
21
22
23
24
25
# Beian icp information for Chinese users. In China, every legal website should have a beian icp in website footer.
beian:
enable: true #显示网站备案信息
icp: 备案说明
# Baidu Analytics ID
baidu_analytics: c43cxxxxxxxxxxxxxxxxxxxxxxxxxxxx #使用百度统计收集网站访问信息

# Baidu Webmaster tools verification setting
# See: https://ziyuan.baidu.com/site
baidu_site_verification: Bxxxxxxxx #百度站长

# Google Webmaster tools verification setting
# See: https://www.google.com/webmasters
google_site_verification: RMxxxxxxxxxxxxxxxxxx #google站长

# Google Analytics
google_analytics: UA-xxxxxxx #google统计

# Enable baidu push so that the blog will push the url to baidu automatically which is very helpful for SEO
baidu_push: true #自动提交网页

# Code Highlight theme
# Available values: normal | night | night eighties | night blue | night bright
# https://github.com/chriskempson/tomorrow-theme
highlight_theme: night eighties #代码高亮主题

如果想在网页中继承搜索功能,可以打开next主题提供的hexo-generator-searchdb,首先要安装hexo-generator-searchdb,然后在next配置文件 _config.yml 中修改

1
2
3
4
5
6
7
8
9
10
11
# Local search
# Dependencies: https://github.com/theme-next/hexo-generator-searchdb
local_search:
enable: true
# if auto, trigger search by changing input
# if manual, trigger search by pressing enter key or search button
trigger: auto
# show top n results per article, show all results by setting to -1
top_n_per_article: 1
# unescape html strings to the readable one
unescape: false

hexo-generator-searchdb 实际上是将所有的文章都写在一个search.xml数据文件中,搜索时只要在search.xml数据文件中查找就能实现查找全网信息的功能。默认配置足可以满足要求,有特殊需要,可以在hexo的配置文件 _config.yml 中添加属性,例如

1
2
3
4
5
search:
path: search.xml #定义数据文件的名字
field: post #搜索范围 post page all
format: html #搜索的文件格式 html raw(markdown原文) excerp more
limit: 10000 #最大搜索数量

还有很多其他配置,可以把 _config.yml 文件浏览一遍,基本能搞懂各项参数是做什么的

至此,一个个性化的网站就配置好了,在blog文件夹运行

1
hexo g

就生成了个性化的网页

进一步修改主题配色等

在next/source/css/_custom文件夹下有custom.styl文件,自定义的样式写在该文件中,例如

1
2
3
4
5
6
7
8
9
10
11
12
13
14
15
16
17
18
19
20
21
22
23
24
25
26
27
28
29
30
31
32
33
34
35
36
37
38
39
40
41
42
43
44
45
46
47
48
49
50
51
52
53
54
55
56
57
58
59
60
61
62
63
64
65
66
67
68
69
// Custom styles.
// 文章内链接文本样式
.post-body p a{
color: #0593d3;
border-bottom: none;
border-bottom: 1px solid #0593d3;
&:hover {
color: #fc6423;
border-bottom: none;
border-bottom: 1px solid #fc6423;
}
}
// 修改选中字符的颜色
/* webkit, opera, IE9 */
::selection {
background: #00c4b6;
color: #f7f7f7;
}
/* firefox */
::-moz-selection {
background: #00c4b6;
color: #f7f7f7;
}
// 修改网站头部颜色
.headband {
height: 3px;
background: #49b1f5;
}
.site-meta {
padding: 20px 0;
color: #fff;
background: #49b1f5;
}
.site-subtitle {
margin-top: 10px;
font-size: 13px;
color: #ffffff;
}
// 修改按键(button)样式
.btn {
color: #49b1f5;
background: #fff;
border: 2px solid #49b1f5;
}
// 按键(button)点击时样式
.btn:hover {
border-color: #49b1f5;
color: #fff;
background: #49b1f5;
}
// 鼠标移动至文章标题时的效果
.posts-expand .post-title-link::before {
content: "";
position: absolute;
width: 100%;
height: 2px;
bottom: 0;
left: 0;
background-color: #49b1f5;
visibility: hidden;
-webkit-transform: scaleX(0);
-moz-transform: scaleX(0);
-ms-transform: scaleX(0);
-o-transform: scaleX(0);
transform: scaleX(0);
transition-duration: 0.2s;
transition-timing-function: ease-in-out;
transition-delay: 0s;
}

优化写作

在blog文件夹生成tags和categories目录,这样就会生成\tags,\categories网页,并且文章的tags等都会集中在tags、categories网页中

1
2
hexo new page tags
hexo new page categories

修改 scaffolds 文件夹下的 post.md 添加更多属性,这样新建一篇文章时就会自动带上这些属性,不用自己手动输入了

1
2
3
title: {{ title }}
tags:
categories:

hexo本身不支持markdown的画图功能,但是可以使用插件来完成,官方插件 npm install --save hexo-filter-mermaid-diagrams
在 _config.yml 添加配置

1
2
3
4
5
6
# mermaid chart
mermaid: ## mermaid url https://github.com/knsv/mermaid
enable: true # default true
version: "7.1.2" # default v7.1.2
options: # find more api options from https://github.com/knsv/mermaid/blob/master/src/mermaidAPI.js
#startOnload: true // default true

在 themes/_partials/footer.swig 中添加

1
2
3
4
5
6
7
8
{% if theme.mermaid.enable %}
<script src='https://unpkg.com/mermaid@{{ theme.mermaid.version }}/dist/mermaid.min.js'></script>
<script>
if (window.mermaid) {
mermaid.initialize({theme: 'forest'});
}
</script>
{% endif %}

mermaid主题可选dark default forest neutral,参考mermaid

至此,美化的网页已经配置好啦。使用hexo g 生成看看效果吧

利用Git在VPS中设置自动部署

如果觉得每次都要手动把public文件夹的内容上传到服务器有点麻烦,可以试试hexo提供的deploy功能。

1
hexo d #将网页文件部署到服务器

只用这样一条简单的指令就能将生成的网页文件上传带服务器,省去了好多时间。hexo提供了多种deployer,我选择Git作为我的deployer。下面来介绍如何实现这一功能。(我的本地系统Windows,远程VPS系统Ubuntu)

首先配置VPS

  1. 安装Git

  2. 为了安全起见,新建一个用户,其权限专门用来git操作而不能login,

    1
    2
    sudo adduser blog #新建一个blog用户
    sudo usermod blog -s /usr/bin/git-shell #设置用户的登陆脚本为git-shell,这样其只拥有git权限

    测试是否配置权限成功,可以用blog用户登陆一下,如果登陆失败并出现

    1
    2
    fatal: Interactive git shell is not enabled.
    hint: ~/git-shell-commands should exist and have read and execute access.

    表示blog用户的权限已经配置好了。

  3. 由于 hexo d 部署指令没有密码输入功能,所以要用无密码的证书登陆方式。使用Git自带的证书生成程序 ssh-keygen来创建公匙和私匙。

    1
    ssh-keygen.exe -t rsa -C "hexo_blog" #注意当输入密码(passphrase)时保持空密码

    使用默认路径和文件名后,会在 C:\Users\name.ssh (具体路径跟你的本地git配置有关) 文件夹内生成两个文件 ‘id_rsa.pub’ ‘id_rsa’ 。将 id_rsa.pub 的内容复制到VPS上blog家目录的 .ssh/authorized_keys 文件内,如果没有这个文件就创建一下。

    “ 注意git默认使用名为 id_rsa 的私匙,其他名字会造成git找不到私匙;当有多个私匙时,用 ssh-add keyname 添加私匙 ”

    测试证书是否安装成功,同样用blog用户登陆一下,如果能够无密码进入终端并自动退出来,说明安装正确。

  4. 在VPS中使用git建立一个裸仓库 (例如 hexo.git),然后在其 hooks 文件夹中新建 post-receive 脚本(post-receive 挂钩在整个过程完结以后运行,可以用来更新其他系统服务或者通知用户

    1
    2
    3
    4
    git init --bare hexo.git
    cd hexo.git/hooks
    echo "git --work-tree=/home/blog/hexo --git-dir=/home/blog/hexo.git checkout -f" > post-receive
    chmod +x post-receive

    注意,/home/blog/hexo 为我的网页文件目录,/home/blog/hexo.git 是git裸仓库,这两个文件夹(包括子目录)都必须属于blog用户,如果不是,要用 chown blog:blog -R ./hexo ./hexo.git 修改所属用户和组。
    上述配置完成后,可以在本地用 git clone 测试一下能不能连接

    1
    git clone blog@域名或IP:/home/blog/hexo.git

    注意,blog表示的是blog用户,不是blog文件夹。如果能够下载表明git仓库建立成功。如果没有权限下载,要检查是否blog用户拥有文件所有权。

  5. 使用nginx或者apache,将sever的根目录指向 /home/blog/hexo

至此,远程VPS的配置就完成了

然后配置本地hexo

将工作转移到本地电脑。由于采用了Git的方式进行部署,所以下载hexo提供的git deployer部署插件。

  1. 在blog文件夹安装 hexo-deployer-git

    1
    npm install hexo-deployer-git --save
  2. 然后修改blog文件夹下的 _config.yml 文件

    1
    2
    3
    4
    5
    6
    # Deployment
    ## Docs: https://hexo.io/docs/deployment.html
    deploy:
    type: git
    repo: blog@域名或IP:/home/blog/hexo.git
    branch: master
  3. 修改完成后就试试hexo的自动部署命令吧。

    1
    2
    hexo g #生成网页
    hexo d #部署到服务器

至此,自动部署到服务器功能已经实现了

写一篇博文试试吧

1
hexo new post 我的第一篇

该命令会在 source_posts 文件夹下生成 文件:我的第一篇.md 文件夹:我的第一篇\ 。然后放一张图片到 我的第一篇\ 文件夹下
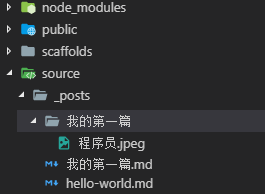
编辑 我的第一篇.md 文件

1
2
3
4
5
6
7
8
9
10
11
12
13
14
15
16
17
18
---
title: 我的第一篇
tags:
- hello world
categories:
---
### 纪念博客建站

这是我的第一篇博客文章,先来写首诗吧

> #### 清平调
> + 云想衣裳花想容, 春风拂槛露华浓。若非群玉山头见, 会向瑶台月下逢。一枝红艳露凝香,云雨巫山枉断肠。
> + 借问汉宫谁得似? 可怜飞燕倚新妆。名花倾国两相欢,长得君王带笑看。解释春风无限恨,沉香亭北倚阑干。

可是我是一个程序员呀
{% asset_img 程序员.jpeg 程序员%}

#### 感谢阅读!

然后生成并部署

1
2
hexo g
hexo d

然后就可以在你的网站上看到啦,大致效果就是下图这样的

小BUG

打赏功能的文字会不停的旋转,修改 next/source/css/_common/components/post/post-reward.styl 文件,屏蔽动画即可

1
2
3
4
5
6
7
/*
#QR > div:hover p {
animation: roll 0.1s infinite linear;
-webkit-animation: roll 0.1s infinite linear;
-moz-animation: roll 0.1s infinite linear;
}
*/
虽然很不要脸,但是还请您多多打赏 ^_^